From Tallulah’s Kitchen: Chelsea Buns

Hello, my fellow foodies, and welcome to August’s edition of The Listing.
This month’s recipe was created during the second month of lockdown when we were all staying at home and making our own entertainment. Time was the one thing we had plenty of, so I took the opportunity to practice my more time-consuming recipes and Chelsea buns do have a few stages to their creation. First we make the dough, then we let it prove, next we create the buns, then a second prove, followed by the baking and finally the buns are glazed and ready to eat, but in my opinion they are very worth the effort!
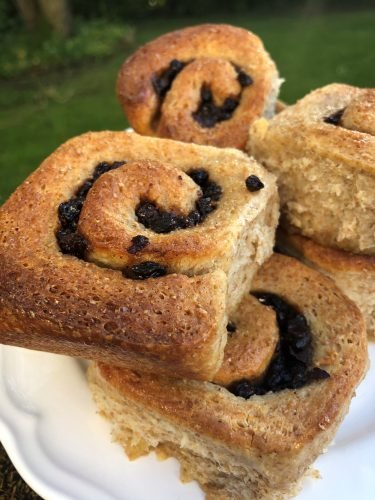
One final note, the more eagle-eyed amongst you will have spotted the photographed buns have been made with whole meal flour. I am sure you will all remember how tricky flour was to find back in May this year, so I had to use what I had. White flour would be my flour of choice for these bakes, the whole meal flour does make them a little “dense” in texture for my taste.
Chelsea Buns
450g strong white flour
25g fresh yeast
100g caster sugar
150ml warm milk
1 egg from happy, healthy free running hens.
75g butter
150g currents and sultanas mixed to your own preference.
2tsp mixed spice
Into the warm milk dissolve 50g of the sugar and stir in the yeast until no lumps are visible. In a large roomy bowl add the flour (I warm my flour first) and pour in the beaten egg, 50g of melted butter and the milk and yeast mixture. Now work this all together to form a soft dough. You may find the mix a little dry in which case add a tiny splash of warm water. Now for the physical bit! Lightly dust your work surface and fingers and start kneading. You are aiming for a slight change in texture – the dough will become smoother yet more elastic. When you have achieved this pop the mixture into a warm, lightly oiled bowl, cover with cling film and leave somewhere warm for approximately one hour or until it has doubled in size. While this is happening, we can prepare the filling. Simply stir the currents, sultanas, mixed spice, and 25g caster sugar into 25g of the softened butter. You could add more or different spices-adjusted it to your personal taste.
When the dough is ready, dust the worktop with a little more flour and knead the dough for a second time. Now roll out the dough to a rectangle approximately 20cm x 30cm.
Spread the filling mixture in an even layer over the surface of the dough. Now we are going to roll the dough into a tight spiral along the length, (like a Swiss roll) try and keep the roll neat and tight it will help the bun to hold together. Now slice into 12 equal pieces and pop them into the greased tin cut side up. This should now be covered with a warm damp tea towel and left to prove again for a further 30 minutes or doubled in size.
When ready the buns should be baked at 200°C for 10 minutes, then drop the temperature to 180°C for a further 10 minutes. The buns should be a beautiful golden-brown colour and have doubled in size. Finally, for the glaze dissolve 25g of sugar in 2 tbsp of water and brush liberally over then buns as soon as they come out of the oven. Leave the buns to cool in their tin for 10 minutes before serving. They are delicious whilst still warm but may be enjoyed when cold too but, as with most baked goods, they are best enjoyed in the day they are baked.
Until next time dear reader,
Talullah Le Fey


